Sunday, September 28, 2008

Forest Fire in a Treasury

Thank to Kae for creating a beautiful treasury on Etsy using art from the VAST street team. She included my Forest Fire painting.


Click here to see the treasury.


Click here to see Kae's art blog.

Friday, September 26, 2008

Things I Learned from Barney - Mixing Colors

My grandchildren love to watch Barney the Dinosaur. Barney and the children sing lots of songs and in the process learn a lot of really cool things. My 2 1/2 year old granddaughter - because of Barney - knows that when you mix blue and yellow you get green.

Sing this to the tune of If You're Happy and You Know It, Clap Your Hands

If you mix blue and yellow you get green.
When you mix the two you'll see
A new color magically.
If you mix blue and yellow you get green.

Then there are verses about red and yellow, and blue and red.

This - mixing colors -is something that I found to be a lot of fun. And it has saved me a lot of money.

I just recently bought some acrylic paint. I had only painted with oil and watercolor before this. I bought some good quality paints and therefore couldn't buy a lot of colors and still fill my car up with gas. So I bought these Liquitex paints:

Cadmium Red Deep Hue, Cobalt Blue Hue, Cadmium Yellow Medium Hue, Hooker's Green Hue Permanent, and Titanium White. I really like this paint. It's nice and thick and creamy and mixes beautifully.

I'll write more later about exactly how to mix tons of colors and shades, (right now I need to get to work) but I wanted you to see these ACEOs. All of the colors you see on these four little paintings were made with the five colors you see above.

So let me encourage you - if you're just starting out - to buy a few colors of paint (primary colors and white) and learn to mix your own colors. You'll understand more about color and save money in the process!

Thursday, September 25, 2008

SOLD - Amber Waves of Grain

I'm always excited and a little surprised - I guess I shouldn't be surprised - when one of my pieces of art sells. I hadn't checked my home e-mail yesterday, (it was Wednesday. I was busy) but when I opened it up this morning I had a notice from Etsy www.etsy.com that "Amber Waves of Grain" sold. How fun is that?

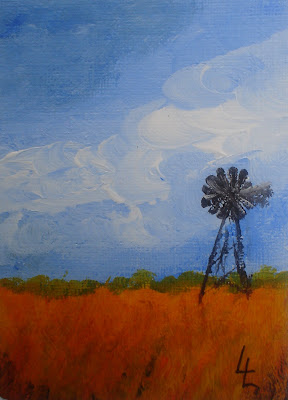
Here are the posts where you can see the other ACEOs ACEOs explained here in my "America the Beautiful" series.


Wednesday, September 24, 2008

Forest Fire!


The second piece of art in my Sycamore Art series is titled "Forest Fire!" (If you missed the first painting, click here Sycamore Art ) That link will also show the sycamore trees.


I started with an old piece of plywood that I had used in making some stained-glass pieces. I chose this piece of wood partly for the great texture - which shows beautifully through the layers of paint - but also because I wanted my Sycamore Art series to be environmentally friendly by not only using the bark, but by recycling an old piece of wood and making something beautiful out of it.
I gessoed the board - I have no idea if that's how you spell that - and then painted it brown before painting layers of reds and oranges with a touch of yellow here and there.

I then picked out some pieces of sycamore bark that looked either like flames or like they had been burned into interesting shapes and mounted them on the painting. I didn't do anything to the bark except mount it and protect it with a coat of varnish. These are the shapes I found them in.

It was very difficult to photograph this work because it has such a shiny finish. No matter what angle or amount of light I used I would get a really bad glare either at the top or across the middle. A side angle seemed to show the color well without getting a glare.

I took a couple of pictures outside hoping the bright light - yet in the shade - would allow me to photograph it without the glare. I also took a picture of it under the tree that the bark came from.
You can see this new painting in my Etsy shop
http://www.etsy.com/view_listing.php?listing_id=15545663

This painting will definitely be a topic of conversation no matter where you hang it.

Monday, September 22, 2008

In an Etsy VAST Treasury

(Notice that the title of this post is clickable!)

Wow! Look at this! My Shining Sea ACEO has been included in a tresury on Etsy. That means someone liked it and it fit in with a theme she had in mind and so now when people go to the treasuries to see what items are being featured, they'll see my painting.

There are some other GORGEOUS paintings in this treasury. I think Mystic Silks "Fickle Winds" may be my favorite. http://www.etsy.com/view_listing.php?listing_id=6866440

Saturday, September 20, 2008

America ACEOs Continued

Here are two more ACEOs from my new series
America the Beautiful.

If you missed the first two you can see them here


An explanation of ACEOs can be found here

Amber Waves of Grain

http://www.etsy.com/view_listing.php?listing_id=15426880


Shining Sea

http://www.etsy.com/view_listing.php?listing_id=15427189


You can find them in my Etsy shop

Feel free to collect the whole set. :-)
We won't think you're being selfish.

Friday, September 19, 2008

America the Beautiful

I've started a series of ACEOs ACEOs explained here called America the Beautiful.
I'll end up with an ACEO for each phrase of the first verse (at least), but I wanted to go ahead and post the first two that I have finished.

O beautiful for spacious skies...

These original miniature paintings are the standard 2 1/2 x 3 1/2 ACEO size. They were painted with acrylic paint on Canva-Paper then mounted to a playing card.

You can click on the link just below each picture to see it in my shop,
or you can go directly to my Etsy shop by clicking here: www.bearhollowcreations.etsy.com

ACEOs

I've started a new series of ACEOs - "America the Beautiful".

Before I talk about these little paintings in particular, let me explain ACEOs for some who may have never heard of such things. (I guess I'll put the America the Beautiful ACEOs in another post.)
ACEO is an abreviation for Art Cards Editions and Originals. Here is a good explanation I found at Associated Content.

"ACEOs are collectible little pieces of art. An ACEO is always two and one-half inches by three and one-half inches. That is the size of a standard sports trading card. The rule about size is the ONLY rule in the ACEO world. An ACEO can be created in any medium the artist desires: paint, colored pencils, ink, etc. There are even ACEOs made from wood, clay, fabric, and metal.

ACEOs are tiny art works that can be matted and framed to hang on the wall. Many people display their ACEO collections in the same kind of plastic sheets and albums that sports card collectors use. You might slip an ACEO into a greeting card as an extra surprise for a birthday, anniversary, or Christmas. ACEOs sell on Ebay for anywhere from ninety-nine cents to over one hundred dollars or more!"

Hahaha! So, if you want to save the Ebay fees and trouble, just send me a hundred dollars and I'll send you one of my ACEOs!


The pictures in this post are of watercolor ACEOs I made last year. They were painted on watercolor papaer and then mounted to a playing card. I sold a few of them. These are still in my Etsy shop http://www.bearhollowcreations.etsy.com/

Wednesday, September 17, 2008

Better Blacks

Better black? "Black is black" I suppose many would say. "And besides, a tube of black paint came in the set of paints I bought."

It's true, black right out of the tube is definitely black, but you'll find that a mixed black gives a beautiful depth and is much more interesting to the eye.

The easiest way to mix black is to take two colors opposite each other on the color wheel and mix them together: green/red, blue/orange, purple/yellow. As you mix, you may first get a shade of brown. That's how I mixed brown for my violin painting http://bearhollowcreations.blogspot.com/2008/09/mixing-brown.html But you'll notice on that painting that there are parts of the body of the violin that are dark and could become black with a little more of the blue added.

In this painting I used my favorite color combination for making black - red and green. I used alizarin crimson and veridian. Actually, I first painted the entire canvas with inexpensive black acrylic. This way I didn't have to worry about any white shining through the background. I then painted the entire background with liquin paint thinner. The liquin allowed me to cover all the background quickly and without using a lot of thick paint. (I wanted the calla lilies to be thick and didn't want them to have to compete with the texture of the background.)
I took my red and green and barely mixed them. I didn't want to lose all of the red or green. Using a criss-cross painting motion, I painted the background with my red/green mix. I don't think you can tell from this photograph, but the red and green can be seen here and there in the background. That's what gives the background some interest and some depth. I think I threw in a little blue here and there too. Not that you really see it, but I really love blue and think everything should have at least a little touch of blue.
So the next time your piece calls for black, see if a mixed black will do the job. You'll be very pleased with the results.

Saturday, September 13, 2008

Sycamore Art

Bear Hollow is filled with trees: tulip poplar, redbuds, oaks, maples, elms, black walnuts... and giant beautiful sycamores. In late July through August the sycamore trees shed their bark. It peels off in beautiful shapes.


I've always wanted to do something - art wise - with these beautiful pieces of bark.


I have a few old planks of barn wood out next to my pole barn. I decided that the rustic wood would make a great backdrop for the sycamore bark. I had thought of mounting the bark on canvas, but it is very strong and tries to curl back up as it dries. I don't think it would stay on the canvas, or would curl and pucker the canvas.
So I took a plank, laid the piece of bark on it that I wanted to use (to know how long to cut the board) and took out the trusty circular saw. Bzzzzzzzzzzzzzzzzzzzzz.


I used water color for my paint. I wanted it to just color the wood - not really cover it. I ended up needing to use a lot and I didn't use much water on later layers because when it was watery it just soaked into the wood and didn't leave much color behind.


Here's my first piece using a piece of sycamore bark. I called it Sycamore Lightning. You can see it in my Etsy shop here - http://www.etsy.com/view_listing.php?listing_id=15203409

Stress cracks from the bark trying to curl back up the way it was on a branch and the grain of the barn wood give a rustic feel while the contemporary abstract background lends a sophistication that will compliment any decor.

The piece is approximately 32 1/4" x 9 1/2". (It curves a little making the top a little smaller. It is old barn wood after all.) The edges are painted black to give a framed look. It is finished with a clear coat of varnish to protect the paint and the wood.


Thursday, September 11, 2008

Mixing Brown

When I painted this painting of my violin I had to experiment quite a bit to find the correct color of brown. I wanted the painting to be very close - if not exact - to the real color of the wood.

Now I've seen many fun paintings of violins in purple or blue or whatever, but for this piece I wanted the real wood color. Violins come in many shades of brown. For that matter, brown comes in many colors. Is that the right word? (shades?, tints?, hues?) You know... some browns have gold in them, some have red or yellow or blue.

My first try was just to take some burnt umber and lighten it a bit. Yuck. So I tried burnt umber with yellow, burnt sienna with blue, lots of different combinations.

The color combination that I had the most success with in mixing a nice brown - and especially a golden brown like my violin - didn't have anything burnt in it. It was orange and blue! This makes sense since they are across from each other on the color wheel. Another combination across from each other are red and green make a nice dark brown that's almost black. When you combine colors that are across from each other on the wheel you are adding together all the colors. This combining of all the colors makes black or brown.

For my violin I started out with orange right out of the tube (I didn't mix my own orange). I then added different blues and even some purples to create the exact brown of my violin. It's been awhile, so I can't tell you exactly which blues I used in the end. I'm thinking it was phthalo blue and cobalt blue and then some purple and more orange for some of the darker areas.
You'll want to experiment to find which combination works for the particular brown you are trying to achieve, but beginning with colors across from each other on the color wheel will give you a great beginning place.
Here is the painting hanging in my office over an antique pump organ.

Saturday, September 6, 2008

Water Color with Hannah and Benjamin


This is Hannah and Benjamin's first time painting with watercolor. Benjamin liked putting his finger in the water and then putting it in his mouth. Grani was hoping the paint is non-toxic.

Hannah is 2 1/2. Benjamin is 18 months.

Friday, September 5, 2008

Trying Something New

I've started a few new art projects. I'll explain them better in a future post. I just wanted to put something new up on this blog.


These are pics of the start of a couple of them.